Configuring ERP/CRM Integrator to connect to an SAP system
One of the most important steps in installing ERP/CRM Integrator for use with SAP is to decide which of the two methods to use for extracting the metadata. The choices are:
- Extract via Direct Database Connection to SAP: Extracting via Direct Database Connection to SAP uses the appropriate RDBMS connectivity software to attach to the SAP Database to extract metadata via SQL calls from the SAP Data Dictionary Tables.
- Extract via ABAP Function Module: Extracting via ABAP uses an ABAP Function Module, supplied with ERP/CRM Integrator, to extract metadata into flat file format, via the SAP Application Layer. ERP/CRM Integrator then takes the flat files and imports the metadata into the ERP/CRM Integrator Repository.
The choice of Extraction Method influences the steps required to successfully implement ERP/CRM Integrator. These are described in the following sections.
Note Extracting via Direct Database Connection to SAP will NOT extract the SAP Attribute definitions, as these are stored in a form not accessible to this connection method. If Attribute Definitions are required, use the ABAP Extraction method.
Connecting to SAP using the Direct Connection Method
If you have chosen to connect to SAP using the ‘Direct’ connection method, then it will be necessary to configure a connection to the SAP database where the required metadata is stored. As with the connection to the ERP/CRM Integrator database, this is achieved using Microsoft ADO (ActiveX Data Objects).
Connecting to SAP using the ABAP Method
If you have chosen to connect to SAP using the ABAP connection method, then it will be necessary to install a SAP Transport, containing an ABAP Function Module on the SAP Application Server. There are four ABAP Function Modules supplied as Transports to ERP/CRM Integrator customers. These are:
- For an SAP system: /SILWOOD/SAFYR_NONCDS
- For an SAP system with CDS (Core Data Services) features: /SILWOOD/SAFYR_CDS.
- For an SAP BW system: /SILWBW/SAFYR_BW
- For an SAP BW HANA system: /SILWBW/SAFYR_BWHANA
Full details of how to install the ABAP Function Modules are to be found in Appendix A of this manual.
Note ERP/CRM Integrator is supplied with four additional ABAP Function Modules (one for SAP, one for SAP CDS, one for SAP BW and one for SAP BW HANA) that can be used to run the ‘main’ ABAP Function Modules from within the SAP environment. These may be used to run the extraction process and create text files if it is not possible to access the SAP system via RFC calls. See Appendix A for details of using these Function Modules.
Required Access Rights for the SAP User used by ERP/CRM Integrator
If the extraction of metadata is to be run via ABAP and from within the ERP/CRM Integrator environment then an SAP Username and Password will be required to enable ERP/CRM Integrator to invoke the ABAP Function Module.
This user must be of User Type ‘Dialog’ or ‘Service’ and have a security profile which allows RFC access to the ERP/CRM Integrator Function Group created above. The minimum SAP Authorization Objects required are S_RFC and S_GUI.
Once the ABAP has been installed, you may proceed to the next stage. Turn to ‘Entering the Extraction Method choice into ERP/CRM Integrator’ below.
Entering the extraction method choice into ERP/CRM Integrator
Once you have decided the extraction method and configured the appropriate connection to the SAP system, navigate to Step 4 of the Repository Wizard. This is where you record the Database type being used by SAP, and the connection method.

- Select the radio button which corresponds to the database type on which the SAP system has been installed. Note: The ‘Direct DB Connect’ method is not available for a HANA based SAP system.
- For Microsoft SQL Server and DB2, a ‘Command Timeout’ property may be specified. This indicates the length of time to allow for a given query to complete. The default is 210 seconds. It will not normally be necessary to enter a value for this field unless ‘timeout’ problems are encountered.
- Select the radio button for the Connection Type
- If the SAP Application Server is installed on a PC rather than a non-windows workstation, check the ‘PC-Like Byte Order…’ check box.
Click the ‘Next’ button.
If you have chosen the ‘Direct DB Connect’ method for extracting metadata from SAP, the next form will be Step 5 – SAP Database Connection (see ‘Entering the SAP Database Connection settings’ below).
If you have chosen ‘SAP RFC Connect’, the next form will be Step 5 – SAP RFC Connection (see ‘Entering the SAP RFC Connection settings’ below).
Entering the SAP database connection settings

Step 5 of the Repository Wizard records the information required for ERP/CRM Integrator to connect directly to the SAP database.
- The Database Alias dropdown list shows all the existing ADO connections previously configured. If this is a new ERP/CRM Integrator installation, it will be necessary to create a new connection to the SAP database. Click on the ‘New’ button to the right of the drop down to begin this process.
- The ‘Edit Connection Definition’ form is now displayed. Enter an appropriate name for the connection in the ‘Connection Definition name’ field and click the ‘OK’ button. The ADO Data Link Properties form is then displayed.

- If the database connection being created is Oracle, select ‘Oracle Provider for OLE DB’ from the list of Providers. If the database connection being created is SQL Server, select ‘Microsoft OLE DB Provider for SQL Server’. For DB2 select the ‘IBM OLEDB Provider for DB2’. Now click the ‘Next’ button.
- The Data Link Properties Connection tab is now displayed. The available fields on this tab will be dependent on the chosen Provider. The layouts for Oracle, SQL Server and DB2 are shown below.
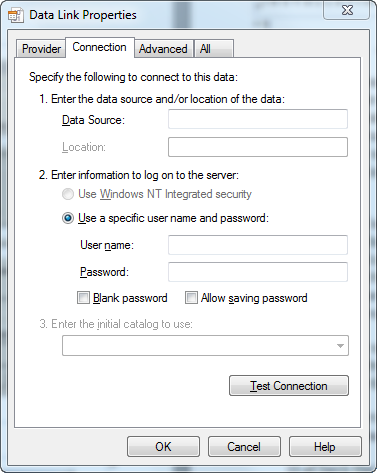
Data Link Properties ‘Connection’ tab for Oracle…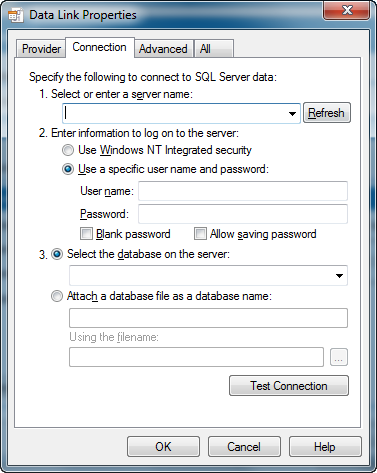
…for SQL Server…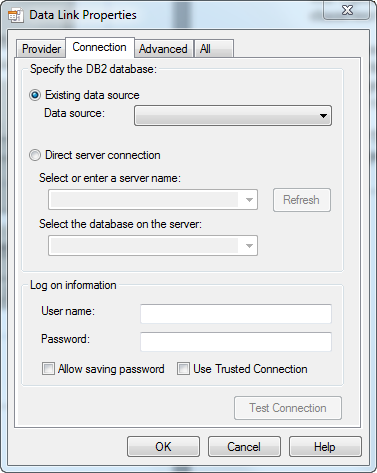
…and for DB2 - For an Oracle database, in the ‘Data Source’ field, enter the connection string for connecting to the Oracle database. This will normally be the string used in the TNSNAMES file for connection to the database. For a SQL Server database, in the ‘Select or enter a server name’ field, enter or select the name of the Server where the database is located. If the database is DB2, enter the database name in the ‘Data Source’.
- Enter a User name and Password. The User Name is a valid database User-id with ‘select’ access rights to the SAP database. Alternatively, leave these fields blank and enter the User Name and Password in the Repository Wizard form. (Note: this is a database Username and Password – not an SAP Application User Name and Password).
- If a User name and Password were entered in the previous step, test the connection to the database by clicking the ‘Test Connection’ button. If the connection is successful, click ‘OK’ to return to the Repository Wizard.
- If not previously entered in the ADO configuration, enter a username and password for the database
- If necessary, enter the SAP Table Owner (for example ‘SAPR3’).
Click the Test Connection’ button to have ERP/CRM Integrator check that the database can be accessed using the supplied information.
The ‘Grant SQL’ button will generate the appropriate SQL ‘Grant’ statements for each of the tables that ERP/CRM Integrator need to access in the SAP database. You can use this feature to help your SAP DBA set up a database user for use in ERP/CRM Integrator.
Click the ‘Save’ button to save all the settings entered during the Repository Wizard session.

Now turn to ‘Opening a ERP/CRM Integrator Repository’ below.
Entering the SAP RFC connection settings

Step 5 of the Repository Wizard records the information required for ERP/CRM Integrator to connect to the SAP system using SAP Remote Function Calls (RFCs). If the ABAP Function Module is being run external to the ERP/CRM Integrator environment (see Appendix A) then there is no need to enter this information.
- Select the Connection Type from the drop-down list. This can be:
- RFC Netweaver. We would recommend this for all new ERP/CRM Integrator repositories.
- RFC Classic. This will be the default for any ERP/CRM Integrator repository already configured prior to ERP/CRM Integrator 6.3.9. RFC Classic is no longer an SAP supported method.
- Enter the Application Server name of the desired SAP system, the SAP Client Number, the System Number and the Username and Password.
- Enter the optional SAPRFC.ini Destination string if the SAPRFC.ini file is being used for connection to SAP systems (see Appendix C for more details of the SAPRFC.ini usage).
- Use the SAP GUI Version drop down to choose the SAP GUI version of 4.x, 6.x or 7.x.
- Select the desired SAP extraction language. If you do not see the language you require, you can modify the range of available language codes by modifying the SafyrSettings.xlsx file. (see Appendix B for details).
- Specify the name of the ABAP Function Module to be invoked by the RFC calls.
- Enter a path for the location of the RFC text files.
Click the Test Connection’ button to have ERP/CRM Integrator check that the SAP system can be accessed using the supplied information.
Click the ‘Save’ button to save all the settings entered during the Repository Wizard session. Now turn to ‘Opening a ERP/CRM Integrator Repository’ below.